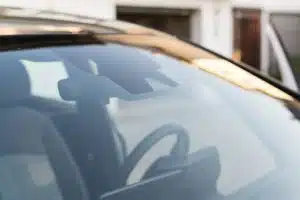
Discovering a small rock chip on your windshield is common, especially on gravel-filled roads. However, these seemingly minor blemishes can escalate if ignored. Addressing them quickly prevents larger cracks from compromising your windshield’s integrity.
Welcome to our guide for effective rock chip repair. We’ll walk you through each step, equipping you with the know-how to navigate this process confidently. With our help, you’ll ensure your windshield’s safety and appearance.
Step 1: Assess the Damage
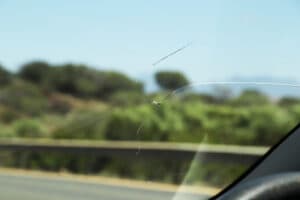
When you discover a rock chip on your windshield, the first step is to examine the extent of the damage closely. Begin by gauging the size of the chip. Is it a tiny speck or a larger indentation? Next, take note of its location. Is it situated near the edge of the windshield or closer to the center? These factors play a significant role in determining the urgency of the repair.
Moreover, evaluating the extent of the windshield damage is crucial. Minor chips, often resembling a star or bullseye pattern, might only affect the outer layer of the glass. On the other hand, larger cracks, which can spread like a web across the windshield, demand immediate attention.
It’s important to understand that while minor chips might seem harmless, they can gradually worsen due to temperature changes and vibrations during driving. This is why it’s recommended to address even the tiniest chips promptly.

Step 2: Gather Necessary Information
Before you proceed further, gathering some essential information about your vehicle and insurance coverage is a good idea. This will streamline the process and give you a clear picture of what to expect during the rock chip repair journey.
Begin by noting your vehicle’s make, model, and year. This helps when communicating with repair shops and insurance providers, aiding in accurate recommendations.
Understanding insurance coverage is vital. Review your policy or contact your provider to confirm if rock chip repair is covered. Some plans offer glass coverage for repairs at minimal expense. A call to your insurer can provide clarity if needed.
With this knowledge, you’ll confidently navigate repair decisions and costs, ensuring a seamless process toward restoring your windshield’s condition.
Step 3: Research Reputable Repair Shops
When entrusting your vehicle’s windshield to a repair shop, it’s important to do your due diligence and find a reputable and experienced establishment. Here are some valuable tips to guide you in your search:
- Online Research: Explore local auto glass repair shops’ websites for services, expertise, and reviews.
- Customer Reviews: Read reviews for insights into service quality and customer satisfaction.
- Experience and Expertise: Choose specialized repair shops with a strong history for better skills and understanding of windshield damage.
- Certification: Opt for certified technicians showing commitment to professionalism.
- Warranty: Inquire about repair warranties for added peace of mind.
- Recommendations: Seek personal suggestions from friends, family, or colleagues who have also experienced windshield damage.
- Compare Quotes: Get quotes from multiple shops for pricing and transparency.
Your windshield’s longevity and your satisfaction depend on the quality of the repair work, making this step well worth the effort.
Step 4: Schedule and Prepare for the Repair
After finding a reputable repair shop, the next step is scheduling the repair appointment promptly. A rock chip on your windshield may seem harmless, but it can expand due to temperature changes and vibrations, risking further damage. Swift action reduces the risk of more extensive repairs.
Tips to Prepare for the Repair Appointment:
- Clean Your Vehicle: Clean around the windshield damage to enhance repair efficiency.
- Clear Clutter: Remove items obstructing the windshield area.
- Specific Preparation: Ask the repair shop for any additional pre-appointment steps.
- Location Instructions: If absent during the repair, provide clear vehicle location instructions.
- Plan for Downtime: Anticipate a short repair duration, around 30 minutes to an hour.
By scheduling promptly and preparing thoughtfully, you contribute to efficient repairs and ensure a smoother experience for you and the repair professionals.

Step 5: Understand the Repair Process
A clear understanding of the rock chip repair process can help alleviate any uncertainties and ensure you’re well-prepared for what to expect. Here’s a breakdown of the typical procedure and some common concerns addressed:
- Resin Injection: The technician injects specialized resin into the chip, bonding glass layers and filling the impact void.
- Curing: UV light or other methods harden the resin, restoring windshield strength.
- Surface Smoothing: The technician ensures a flush finish post-cure, enhancing appearance and visibility.
Step 6: Follow Aftercare Instructions
After your rock chip repair is complete, a little extra care can go a long way in ensuring the longevity of the repair and maintaining the overall health of your windshield. Here are some post-repair care instructions to keep in mind:
- Gentle Handling: Treat the repaired area gently for 24 hours. Avoid slamming doors, driving over potholes, or sudden impacts to prevent damage.
- Skip Car Washes: Steer clear of high-pressure car washes for a few days. Powerful water jets can harm the repair, so wait until it’s fully set.
- Allow Curing Time: Depending on the resin used, give the repair time to cure. Wait as advised before resuming regular activities.
- Temperature Caution: Shield the repaired spot from rapid temperature shifts. Park in the shade during extreme heat or cold to prevent stress on the repair.
- Gentle Cleaning: Use a soft cloth and mild glass cleaner for cleaning. Avoid abrasive materials to prevent scratches, especially around the repaired area.
By following these aftercare instructions, you’re contributing to the success of the repair and ensuring that the repaired area remains strong and intact. Remember, a little caution in the days following the repair can prevent potential setbacks and keep your windshield looking and performing at its best.
Step 7: Regularly Inspect for Changes
Regularly inspecting the repaired area is a proactive step to ensure everything is holding up well. Even though modern repair techniques are highly effective, external factors or unforeseen circumstances can still impact the repaired spot over time. By catching any changes or issues early, you can address them promptly.
For example, if a crack starts to spread from the repaired area, intervening early can prevent it from growing further. This proactive approach can save you from having to deal with a larger and more extensive repair down the line.

Trust Utah Mobile Auto Glass to Fix Windshield Damage
Utah Mobile Auto Glass stands ready to address your windshield concerns and resolve damage quickly and effectively. Whether it’s a repair or replacement, our experts are committed to restoring your windshield to its optimal condition.
Contact Utah Mobile Auto Glass through our online form or by calling us at 801-997-9161.
toto slot